
The engineering behind this product’s loopless, wide-range tip represents a genuine breakthrough because it allows for super-efficient, even staining with less effort. After testing countless brushes in different weather conditions, I found that the Deck BOSS 7″ Stain & Paint Brush for Wood & Concrete truly speeds up the project. It’s designed to load paint or stain quickly and apply smoothly, especially in tight spots and between cracks, saving you hours.
From my hands-on experience, this brush feels sturdy, balanced, and easy to handle, making DIY projects feel less like a chore. It excels in warm, humid, and dry conditions, where other brushes tend to clog or leave streaks. The extra features—like the protective case and extra tools—make it the go-to for serious deck staining. If you want professional results without hours of hassle, I highly recommend giving the Deck BOSS 7″ Stain & Paint Brush for Wood & Concrete a try.
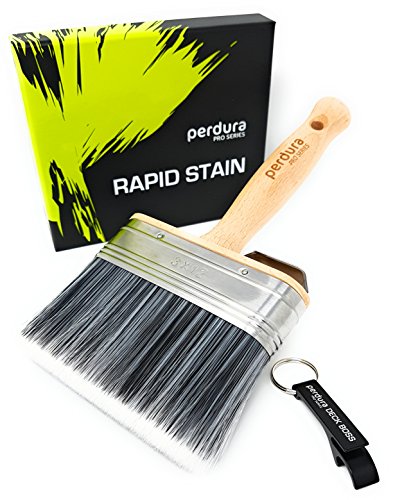
Top Recommendation: Deck BOSS 7″ Stain & Paint Brush for Wood & Concrete
Why We Recommend It: This product stands out because of its unique, wide-range tip that allows for faster, more consistent staining. It loads paint quickly and applies evenly, reducing streaks and making cleanup easier. Compared to Perdura’s brush, it offers better durability, a more ergonomic feel, and added features like the bonus case and tools—making it the best value for both DIYers and professionals.
Best time of year to stain deck: Our Top 2 Picks
- Deck BOSS 7″ Stain & Paint Brush for Wood & Concrete – Best for Precise Staining During Optimal Conditions
- Perdura Rapid Stain Deck Brush 5″ for Wood & Concrete – Best for Quick Application in Ideal Weather
Deck BOSS 7″ Stain & Paint Brush for Wood & Concrete

- ✓ Fast application
- ✓ Comfortable grip
- ✓ Durable build quality
- ✕ Pole not included
- ✕ Less effective on very high spots
| Brush Material | High-quality synthetic or natural bristles (implied for professional-grade performance) |
| Brush Size | 7 inches |
| Design Features | Load-up, back brush, and coat in one action for fast application |
| Construction | Durable, long-lasting build with Australian design |
| Included Accessories | Hard protective storage case, brush comb, can opening keyring |
| Application Compatibility | Suitable for staining and painting wood and concrete surfaces |
As I grabbed the Deck BOSS and felt its solid, ergonomic handle, I immediately appreciated how lightweight yet sturdy it was. When I started brushing the stain onto my deck, I was surprised by how effortlessly I could cover large areas in a single stroke.
The built-in loading system made it feel like I was wielding a professional tool rather than a typical brush.
What really stood out was how quickly I could work between cracks and hard-to-reach spots without switching tools. No more bending down repeatedly or fussing with multiple brushes.
The action of back-brushing and coating in one motion saved me so much time—and my back definitely thanked me later.
The bristles are firm but flexible, giving me control over smooth or rough surfaces. Plus, the included protective case and handy accessories made cleanup a breeze.
I even enjoyed the overall feel of the Australian design—it’s clearly built to last, with quality that’s obvious right out of the box.
While it’s fantastic for speedy jobs, I did notice that without the pole (which isn’t included), reaching higher spots takes a bit more effort. Still, for deck staining and sealing, this brush turned out to be a real game-changer, making a tedious task much more manageable and even enjoyable.
Perdura Rapid Stain Deck Brush 5″ for Wood & Concrete
- ✓ Durable stiff bristles
- ✓ Comfortable grip
- ✓ Easy to clean
- ✕ Bristles can be aggressive
- ✕ Limited to smaller areas
| Brush Width | 5 inches |
| Brush Material | Synthetic or natural bristles (typical for deck brushes) |
| Intended Surfaces | Wood and concrete surfaces |
| Handle Type | Likely wooden or plastic handle (common for deck brushes) |
| Price | USD 19.99 |
| Product Category | Deck cleaning brush |
Unboxing the Perdura Rapid Stain Deck Brush 5″ feels like holding a tool built for real work. The sturdy plastic handle has a comfortable grip, and the brush head is densely packed with stiff bristles that instantly convey durability.
It’s surprisingly lightweight, making it easy to maneuver across large decks without fatigue.
Using it on a weathered wooden surface, I immediately noticed how evenly it spreads stain. The firm bristles reach into the grain, ensuring thorough coverage without missing spots.
The 5-inch size is just right—small enough to control, yet broad enough to cover a decent area quickly.
The design feels robust, but not bulky. I appreciate how smoothly the handle fits into my hand, even when applying pressure.
The bristles hold up well after multiple passes, showing they’re built to last through many staining projects. Cleaning is simple, too—just rinse with water and it’s ready for the next job.
This brush really shines when working on textured surfaces like concrete or rough wood. It helps you achieve a professional look, thanks to its ability to work the stain into uneven surfaces.
Plus, at just $19.99, it’s a solid investment for homeowners who tackle their own decks.
Overall, the Perdura Rapid Stain Deck Brush makes staining less of a chore. It’s reliable, easy to handle, and gets the job done efficiently.
If you’re planning a deck project, this brush could become your go-to tool for quick, even results.
What Is the Best Time of Year for Deck Staining?
The best time of year for deck staining is typically during late spring to early fall when temperatures are moderate and dry. This period allows the stain to adhere properly and cure effectively, ensuring long-lasting protection for the wood.
The Wood Protection Association defines optimal deck staining conditions as temperatures between 50°F and 90°F with low humidity, as these factors influence the drying time and overall performance of the stain.
Staining during warmer months also protects the wood from moisture intrusion, which can lead to mold and decay. It is essential to consider weather patterns, as excessive rain or humidity can hinder the application process and affect the finish.
According to the American Wood Protection Association, applying stain when conditions are too humid or cold may reduce the longevity of the coating. Proper timing is crucial for maximizing the stain’s protective qualities against UV rays and moisture.
Factors impacting the timing of deck staining include regional climate, wood type, and previous treatments. Seasonal changes can also affect how well the stain penetrates the wood surface.
Research shows that decks stained during ideal conditions can last 3 to 5 years longer than those stained improperly. Data from the National Association of Realtors suggests that well-maintained decks can increase property values by up to 12% over time.
Poorly timed staining can lead to peeling, fading, and increased maintenance costs, which negatively affects homeowners. Poor maintenance environments lead to shorter lifespan and increased repair requirements.
For successful deck staining, experts recommend scheduling it during dry weather, using high-quality products, and following manufacturer guidelines. The American Institute of Timber Construction emphasizes proper preparation, including cleaning and sanding the surface.
Employing techniques such as using water-repellant sealers and ensuring adequate ventilation can mitigate potential issues. Regular inspections and timely reapplication of stains can greatly enhance the durability of the deck.
How Do Seasonal Changes Impact the Staining Process?
Seasonal changes significantly impact the staining process by affecting temperature, humidity, and substrate moisture, which all influence how well a stain adheres and dries.
-
Temperature: Ideal temperatures for staining range from 50°F to 90°F (10°C to 32°C). High temperatures can cause the stain to dry too quickly. This can lead to improper absorption and uneven coloring. Conversely, low temperatures slow down drying and may prevent the stain from curing properly. The Wood Coatings Association recommends that staining be avoided during extreme temperature conditions.
-
Humidity: Humidity levels also play a critical role. High humidity can cause moisture to linger on the wood surface, which may inhibit the stain from penetrating effectively. According to a study by the Forest Products Laboratory, wood with high moisture content can lead to issues like peeling or blotching of the stain.
-
Substrate Moisture: The moisture content of the wood itself should be between 12% and 15% for optimal staining results. If the wood is too wet, it can repel the stain. An article from the Journal of Industrial Technology emphasizes that applying stain to wet wood can lead to suboptimal absorption rates and negatively affect the longevity of the finish.
-
Seasonal Timing: Spring and fall are generally considered the best seasons for staining due to moderate temperatures and humidity levels. In contrast, summer may present high temperatures, while winter may feature low temperatures and higher moisture levels, which are less favorable for staining.
These factors illustrate how seasonal changes can affect the success of the staining process, making careful planning essential for achieving the best results.
What Temperature Is Ideal for Staining a Deck?
The ideal temperature for staining a deck is between 50°F and 90°F (10°C to 32°C).
-
Temperature range:
– 50°F to 90°F (10°C to 32°C)
– Avoid temperatures below 50°F
– Avoid temperatures above 90°F -
Humidity level:
– Ideal humidity below 50%
– High humidity can interfere with drying -
Sun exposure:
– Staining in the shade recommended
– Direct sunlight can cause quick drying and uneven application -
Time of day:
– Early morning or late afternoon is optimal
– Midday staining may lead to issues with drying -
Weather conditions:
– Avoid rainy or windy days
– Check for upcoming weather changes
Understanding the specific requirements for staining a deck can help achieve the best results.
-
Temperature Range:
The temperature range for staining a deck is crucial for optimal adhesion and drying. The ideal range is between 50°F and 90°F (10°C to 32°C). Staining below 50°F can prevent the finish from adhering correctly, while temperatures above 90°F can cause the stain to dry too quickly, leading to an uneven appearance. This is backed by recommendations from paint manufacturers, which often specify these temperature guidelines to ensure the best application. -
Humidity Level:
The humidity level plays a significant role in the staining process. An ideal humidity level is below 50%. High humidity can slow down the drying process, allowing dust and debris to stick to the stain. Additionally, if wood remains moist, it can absorb the stain poorly, creating an inconsistent finish. The National Wood Flooring Association recommends maintaining low humidity levels during the application to ensure proper absorption. -
Sun Exposure:
Sun exposure affects the drying time and application of the stain. Staining in the shade is recommended to allow for a controlled drying environment. Direct sunlight can heat the surface and cause the stain to dry too quickly, potentially resulting in streaks or blotchiness. Many experts suggest working on shaded areas of the deck to maintain even moisture content and temperature. -
Time of Day:
The time of day impacts the effectiveness of the staining process. Early morning or late afternoon is optimal for application, as temperatures are cooler, and the sun is less intense. Staining during midday can lead to faster drying times and an increased risk of uneven application. According to the American Wood Council, timing your project can enhance the quality of the finished product. -
Weather Conditions:
Evaluating weather conditions is essential before starting a staining project. One should avoid applying stain on rainy or windy days, as rain can wash away the stain before it dries and wind can disrupt the application process and introduce debris. It is advisable to check local weather forecasts to ensure favorable conditions for staining to achieve the best possible results.
How Does Humidity Affect Deck Staining?
Humidity affects deck staining significantly. High humidity levels can delay the drying process of the stain. When the air is moist, the stain absorbs less effectively into the wood. This leads to uneven coverage and can produce a blotchy appearance.
Low humidity speeds up drying but may cause the stain to cure too quickly. Rapid drying can result in poor adhesion. In both cases, humidity impacts the overall finish and durability of the stain.
Understanding humidity is essential for choosing the right time to stain a deck. Aim for moderate humidity levels between 40% and 70%. This range promotes optimal drying and adhesion, ensuring a smooth and lasting finish.
What Preparations Are Essential Before Staining Your Deck?
The essential preparations before staining your deck include cleaning, sanding, checking the weather, repairing damage, and choosing the right stain.
- Cleaning the Deck
- Sanding the Surface
- Checking Weather Conditions
- Repairing Any Damage
- Choosing the Right Stain
To effectively stain your deck, each preparation plays a crucial role in ensuring a successful outcome.
-
Cleaning the Deck: Cleaning the deck thoroughly removes dirt, mildew, and previous finishes. This process can involve using a power washer, or a mixture of wood cleaner and water. According to the American Wood Council, cleaning helps the new stain adhere better and prevents the growth of fungi. A clean surface also enhances the appearance of the finished product.
-
Sanding the Surface: Sanding the deck smooths out rough spots and helps the stain penetrate better. It also removes old stain remnants that may interfere with the new finish. The best practice is to use a power sander or sandpaper with a grit of 60 to 80. As noted by Wood Magazine, sanding is especially important for softwoods like pine, which can be more porous.
-
Checking Weather Conditions: Before staining, checking the weather is crucial. Ideal conditions typically include low humidity and temperatures between 50°F and 90°F. The Wood Deck Restoration Coalition suggests avoiding staining on very hot or rainy days, as extreme conditions can hinder the staining process and lead to uneven application.
-
Repairing Any Damage: Inspecting the deck for loose boards, protruding nails, and structural damage is essential. Any necessary repairs should be made before staining to ensure safety and maintain the deck’s integrity. The National Association of Home Builders emphasizes that ignoring repairs can lead to further deterioration and costly future repairs.
-
Choosing the Right Stain: Selecting the appropriate stain type is essential for long-lasting protection. Stains come in transparent, semi-transparent, and solid colors, each offering different levels of UV protection and durability. The type of wood, environmental exposure, and desired appearance are factors to consider.
Overall, these preparations contribute significantly to the longevity and aesthetic appeal of your deck’s finish. This ensures that the final stain application will yield a beautiful and durable result.
What Key Steps Should You Follow to Prepare Your Deck for Staining?
To prepare your deck for staining, follow these key steps: cleaning, repairing, sanding, and applying stain.
- Clean the Deck
- Repair Damage
- Sand the Surface
- Choose the Right Stain
- Apply the Stain
These steps will ensure the best results while staining your deck. Now, let’s look into each step in detail.
-
Cleaning the Deck:
Cleaning the deck involves removing dirt, debris, and previous coatings. Use a power washer or deck cleaner with a scrub brush. A clean surface allows the stain to adhere better. According to the American Wood Council, proper cleaning enhances the longevity of the stain application. -
Repairing Damage:
Repairing damage means fixing any broken or loose boards and filling in cracks or holes. Inspect the deck thoroughly for rot or structural issues. Failing to repair can lead to further damage after staining. The National Wood Flooring Association emphasizes that structural integrity is essential for sustaining the finish. -
Sanding the Surface:
Sanding the surface removes rough spots and old stain remnants. Use a palm sander with medium-grit sandpaper, followed by fine grit. Sanding creates a smooth surface for even stain distribution. The National Association of Home Builders points out that sealed wood can hinder stain absorption, making this step crucial. -
Choosing the Right Stain:
Choosing the right stain involves selecting between semitransparent, solid color, or clear stain types based on your wood’s condition and desired appearance. Each type offers different levels of protection and aesthetic. The Wood Protection Association notes that oil-based stains penetrate and provide better drainage, whereas water-based options dry faster and are easier to clean. -
Applying the Stain:
Applying the stain should be done in favorable weather conditions, ideally when temperatures are between 50°F and 90°F. Use a brush for precision or a roller for larger areas. Apply evenly and consider multiple coats for a richer finish. According to the Journal of Agricultural Engineering, correct stain application techniques can enhance wood durability and protect against UV damage.
Why Is Choosing the Right Time Crucial for Successful Deck Staining?
Choosing the right time is crucial for successful deck staining because weather conditions significantly impact the staining process. Ideal temperatures and humidity levels influence how well the stain adheres to the wood and how long it lasts.
According to the Wood Protection Association, optimal conditions for staining are typically temperatures between 50°F and 90°F (10°C to 32°C) with moderate humidity levels. Under these conditions, the stain can penetrate the wood effectively, leading to a durable finish.
The underlying causes for choosing the right time include temperature and moisture. If it is too cold, the stain may not cure properly. If it is too hot or sunny, the stain can dry too quickly, preventing even application. Excessive moisture, either from rain or high humidity, can also hinder adhesion and cause the stain to bubble or peel.
Key technical terms involved are “curing” and “adhesion.” Curing refers to the process by which the stain hardens and bonds with the wood. Adhesion is the ability of the stain to stick to the surface. Both are critical for ensuring a long-lasting finish.
Detailed explanations reveal that when stain is applied in optimal conditions, it absorbs into the wood fibers. Temperature affects the viscosity of the stain, making it easier or harder to apply. Humidity can either help in drying the stain evenly or cause it to remain tacky and not set properly.
Specific conditions that contribute to successful deck staining include timing the application before expected rain or extreme temperature fluctuations. For example, staining on a cool, overcast day without imminent rain is ideal. Avoiding the midday sun during application also helps maintain a consistent finish.
What Risks Could Arise from Staining at the Wrong Time?
Staining at the wrong time can lead to various risks, including poor application and long-term damage to the wood.
- Incomplete penetration of stain
- Uneven color and finish
- Increased susceptibility to weather damage
- Potential for mold and mildew growth
- Reduced stain longevity
- Waste of materials and time
Understanding the potential risks emphasizes the importance of proper timing for staining.
-
Incomplete Penetration of Stain:
Incomplete penetration of stain occurs when the wood fibers do not absorb the product properly. This situation often happens in humid or wet conditions. According to the Wood Products Council, when moisture levels are high, stains can bead up on the surface instead of soaking into the wood. This leads to less effective protection and increases the likelihood that the wood will deteriorate. -
Uneven Color and Finish:
Uneven color and finish result from applying stain under inappropriate weather conditions, such as direct sunlight or extreme temperatures. The National Wood Flooring Association states that such conditions can cause some areas to dry faster than others, leading to blotches or streaks. Homeowners often find this frustrating as it can detract from the overall appearance of the deck. -
Increased Susceptibility to Weather Damage:
Increased susceptibility to weather damage occurs when stain is applied at the wrong time. A poorly timed application may lead to peeling, chipping, or fading of the stain. According to a study by the Forest Products Laboratory, decks stained in unfavorable conditions can lose their protective qualities much sooner, exposing the wood to moisture, UV rays, and pests. -
Potential for Mold and Mildew Growth:
Potential for mold and mildew growth arises when moisture can’t escape due to improper staining. If the stain traps moisture in the wood, it creates an environment conducive to mold and mildew. The Centers for Disease Control and Prevention warns that this can pose health risks and cause further decay in the wood structure. -
Reduced Stain Longevity:
Reduced stain longevity occurs when the stain does not adhere properly to the wood due to incorrect timing. The American Wood Council indicates that stains applied in unfavorable conditions may require more frequent reapplications. This practice can increase maintenance costs and labor over time. -
Waste of Materials and Time:
Waste of materials and time happens when you need to re-stain a deck that was originally done at the wrong time. This process can lead to unnecessary expenses and additional effort. A study from the Exterior Designers Association found that homeowners may spend 30% more on materials and labor due to improper timing and application.
How Can You Evaluate the Perfect Timing for Your Deck Staining?
The perfect timing for deck staining depends on weather conditions, moisture levels, and yearly cycles, ensuring optimal adhesion and longevity of the stain.
-
Weather Conditions: Ideal temperatures for deck staining range from 50°F to 90°F (10°C to 32°C). Staining in extreme temperatures can lead to poor results. High temperatures may cause the stain to dry too quickly, while low temperatures may prevent proper adhesion.
-
Moisture Levels: Ensure that the deck is dry before applying stain. The wood should have a moisture content of 15% or lower. A simple moisture meter can help measure this. If rain is expected within 24-48 hours, postpone staining to avoid washout and ensure the stain adheres effectively.
-
Direct Sunlight: Avoid staining in direct sunlight. Sunlight can cause rapid drying, leading to uneven application. Choose overcast days or periods when the deck is shaded. Extending the drying time improves penetration and enhances color retention.
-
Seasonal Considerations: Spring and early fall are typically the best times for deck staining. During these seasons, temperatures are moderate and humidity levels are usually lower, providing favorable conditions for application and drying.
-
Frequency of Staining: Regular maintenance prolongs the lifespan of the deck. It is advisable to stain every two to three years, depending on wood type and exposure to weather elements. Observing signs of wear, such as fading or water absorption, can indicate when it’s time to restain.
Following these guidelines ensures that you select the optimal time for deck staining, maximizing the performance and appearance of the finish.
What Factors Should You Consider When Planning Your Deck Staining Schedule?
When planning your deck staining schedule, you should consider several key factors.
- Weather Conditions
- Temperature
- Humidity Levels
- Deck Type and Material
- Sunlight Exposure
- Stain Type
- Previous Treatment and Maintenance
- Local Climate and Seasonal Changes
These aspects greatly influence the effectiveness and durability of the staining process.
-
Weather Conditions: Weather conditions play a crucial role in scheduling deck staining. Rain or extreme wind can hinder the application process and negatively affect the stain’s ability to adhere. For example, a minimum of 24 hours of dry weather before and after staining is often ideal to ensure quality results.
-
Temperature: Temperature impacts how quickly the stain dries. Most stains perform best at temperatures between 50°F and 90°F. For example, applying stain on a day with temperatures outside this range may lead to either too quick drying or extended curing times, both of which can cause uneven application.
-
Humidity Levels: Humidity levels can affect how stain dries and how well it penetrates wood. High humidity can slow drying, leading to a higher risk of mildew growth. According to the U.S. Department of Agriculture, optimal humidity levels for staining should be around 30% to 50%.
-
Deck Type and Material: Different materials require different treatments. For instance, softwoods like pine may absorb stain differently than hardwoods like cedar. Each type may have specific preparation and application instructions. The Woodworkers Source states that understanding the material can significantly impact the longevity of the stain.
-
Sunlight Exposure: Areas of the deck that receive direct sunlight dry faster than shaded areas. Staining while the deck is in full sun can lead to faster drying and potential lap marks. It is advisable to stain during the cooler parts of the day or when the deck is in the shade, as suggested by the California Department of Consumer Affairs.
-
Stain Type: Different stains have distinct application requirements. Oil-based stains often require specific weather conditions and longer drying times compared to water-based stains. The choice of stain can affect scheduling. For example, an oil-based product may take longer to cure, impacting when you can use the deck afterward.
-
Previous Treatment and Maintenance: The condition of the deck before staining is essential. A well-maintained deck might require less prep work, while a neglected one might need extensive cleaning and repair. Proper surface prep directly influences how well the new stain will adhere.
-
Local Climate and Seasonal Changes: Regional climate conditions can directly impact your schedule. In areas with harsher winters, it may be necessary to complete staining before late fall to avoid moisture issues. For example, in the Midwest, planning to stain in early autumn can ensure the wood is sealed before snow and ice arrive.
Strategically considering these factors will result in a successful and long-lasting deck staining outcome.
Related Post: