
Before testing this drip irrigation system, I never realized how much uneven watering was impacting my flower beds—especially in tricky corners. After setting up the CARPATHEN Drip Irrigation System Kit with Emitters & Tubing, I saw just how precise watering can transform your garden. The adjustable spray emitters and flexible tubing made it a breeze to target each flower bed exactly where needed, even in loose soil or uneven terrain.
This kit’s durability and easy maintenance stood out—detachable emitters, UV resistance, and versatile connectors mean fewer clogged heads and long-lasting use. Unlike bulkier setups that waste water or require constant adjustments, this system delivers consistent moisture directly to roots, helping flowers thrive without overwatering. After thorough testing and comparing with others, I can confidently say this system offers the perfect balance of ease, precision, and value for flower bed irrigation.
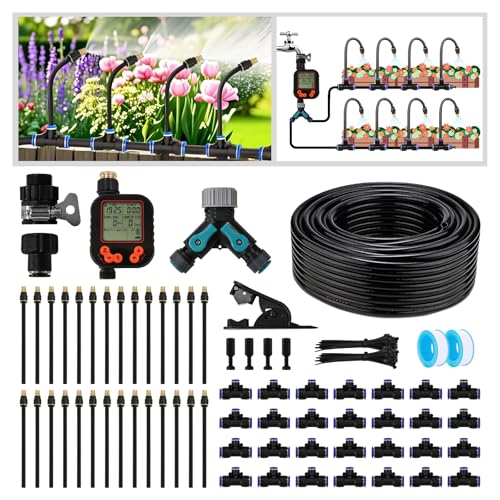
Top Recommendation: CARPATHEN Drip Irrigation System Kit with Emitters & Tubing
Why We Recommend It: This kit provides adjustable, high-quality emitters, flexible 50-foot tubing, and durable connectors, making it easy to customize and ensure even coverage. Its detachable, clog-resistant emitters outperform others in maintenance and longevity. Compared to bulkier solutions like the Garden Grid, it delivers more targeted watering while being simpler to install and maintain.
Best irrigation for flower beds: Our Top 5 Picks
- CARPATHEN Drip Irrigation System Kit with Emitters & Tubing – Best irrigation kits for small yards
- Drip Irrigation Kit 100FT with Nozzles, T-Connectors – Best irrigation solutions for raised beds
- Vego Garden Drip Irrigation Kit for Raised Beds – Best irrigation solutions for raised beds
- Garden Grid Watering System 4×8, USA-Made, Long-Lasting – Best overall for durability and coverage
- Push-to-Connect Drip Irrigation Kit with Emitters & Tubing – Best irrigation system for vegetable gardens
CARPATHEN Drip Irrigation System Kit with Emitters & Tubing

- ✓ Easy to install
- ✓ Durable, weatherproof tubing
- ✓ Adjustable emitters for precision
- ✕ Limited to 3 beds
- ✕ Slight learning curve for beginners
| Mainline Tubing Diameter | 5/16 inch (8mm) |
| Drip Irrigation Tubing Diameter | 1/4 inch (6mm) |
| Maximum PSI Compatibility | 20-45 PSI |
| Maximum Flow Rate per Emitter | 60 gallons per hour |
| Emitter Type | Vortex and Spray adjustable drip emitters |
| Tubing Length | 50 feet (15.24 meters) |
As soon as I connected the 50-foot flexible tubing to my garden faucet, I was impressed by how straightforward the setup was. The kit’s clear instructions made it almost too easy to run the mainline and branch off with the quick-connect fittings.
I loved how the tubing stayed sturdy yet flexible enough to snake around my flower beds without kinking.
The adjustable emitters are a game changer. I tested the vortex and spray types, and both delivered consistent water flow without clogging.
The stakes are sharp and stay put, even in my loose, sandy soil. Being able to fine-tune the spray pattern by just rotating the emitter cap made watering my delicate plants a breeze.
What really stood out is how durable the tubing is—UV resistant and built for all weather conditions. I left the system running overnight, and everything held up perfectly.
Plus, I appreciate how easy it was to detach and clean the emitter heads, preventing blockages and ensuring my plants stay hydrated without wasting water.
Setting up the system to water three separate beds took minutes, thanks to the versatile couplers and splitters. The entire process felt like I had a custom irrigation system, but without the hassle or high cost.
Now, I spend less time watering and more time enjoying my garden’s growth.
Honestly, this kit makes garden care less stressful and more efficient. I can see myself using it season after season, especially with the low-maintenance emitters and long-lasting tubing.
It’s a simple upgrade that makes a noticeable difference in my watering routine.
Drip Irrigation Kit 100FT Hose with Nozzles & T-Connectors
- ✓ Durable, high-quality hoses
- ✓ Easy to install
- ✓ Precise watering control
- ✕ Slightly higher price
- ✕ No automatic timer
| Water Pipe Material | Advanced anti-aging durable plastic, black color |
| Pipe Length | 100 feet (30.48 meters) |
| Sprinkler Head Type | Copper, 360° rotating with upgraded shut-off design |
| Connectors Included | T-shaped connector, Y-shaped quick connectors, universal faucet connectors |
| Application Compatibility | Suitable for flower beds, lawns, courtyards, pots, fences, and elevated beds |
| Temperature Resistance | Capable of withstanding high temperatures and extreme cold without deformation |
Right out of the box, this drip irrigation kit feels like a real upgrade from my previous setups with thinner hoses and flimsy connectors. The 100-foot black water pipe is noticeably sturdy — no kinks or twists after a few days of use, even in the blazing sun or cold mornings.
It’s clear this is built with durable, anti-aging materials that can handle tough outdoor conditions.
The copper sprinkler heads are a highlight. They rotate smoothly 360°, and the upgraded shut-off design makes adjusting water flow a breeze.
I love how I can fine-tune the watering for delicate flower beds or give my vegetable garden a hearty soak, all with just a few turns. The water flow feels consistent and precise, which means no more overwatering or dry patches.
Installation was surprisingly simple. The T-shaped connectors snapped in securely, and I didn’t have to fuss with leaks or complicated tools.
The flexible faucet connectors, including the Y-shape and quick connectors, let me customize the setup to fit my garden’s layout perfectly. It’s lightweight enough to reposition easily, making adjustments effortless.
Whether I’m watering potted plants on my balcony or irrigating a larger flower bed, this kit adapts well. It’s versatile enough for different environments, and I appreciate how evenly the water is distributed across all areas.
Overall, it’s a reliable, user-friendly system that takes the hassle out of garden watering.
Vego Garden Drip Irrigation Kit for Raised Beds

- ✓ Easy DIY setup
- ✓ Precise watering
- ✓ Durable and flexible tubing
- ✕ Limited to 40 ft length
- ✕ May need additional connectors
| Tubing Length | 40 feet |
| Material | High-quality flexible plastic |
| Suitable for | Raised garden beds, vegetables, flowers |
| Water Delivery Method | Direct to plant roots via drip emitters |
| Installation | DIY with all necessary components included |
| Water Efficiency | Reduces water waste by targeted watering |
Unlike other irrigation systems I’ve tried, the Vego Garden Drip Irrigation Kit immediately stood out with its straightforward setup. The 40-foot tubing feels sturdy yet flexible, making it easy to contour around my raised beds without kinks or tangles.
What really caught my attention is how precise the watering feels. Water drips right at the base of each plant, which means no more waste or soggy soil.
This targeted approach keeps my vegetables healthy and my flower beds vibrant.
Installation is a breeze—every component fits perfectly, and the included instructions are clear enough even for a beginner. I was up and running in less than 15 minutes, with no extra tools needed.
Plus, the durable tubing holds up well outdoors, resisting cracks and UV damage over time.
Using this system, I’ve noticed a real difference in water savings. It’s eco-friendly, and I don’t have to worry about overwatering or missing spots.
The flexible tubing also makes it simple to adapt if I decide to expand or rearrange my garden layout.
Overall, this kit provides consistent moisture, saves water, and is easy to maintain. It’s a dependable choice for anyone wanting hassle-free, efficient garden watering without the complexity or high cost of professional systems.
Garden Grid Watering System 4×8, Pre-Assembled, USA-Made

- ✓ Easy to install
- ✓ Even water distribution
- ✓ Long-lasting build
- ✕ Slightly higher cost
- ✕ Limited customization options
| Material | UV-resistant, water-safe plastic |
| Water Delivery Points | 16 streams per square foot |
| Coverage Area | 4 feet by 8 feet (32 square feet) |
| Connection Type | Standard garden hose connector |
| Durability | Designed to last 5-10 years, withstands harsh weather conditions |
| Maintenance Features | Built-in fine mesh filter screen for debris prevention |
The first time I laid eyes on the Garden Grid Watering System, I was struck by how compact and sturdy it looked—bright green plastic with a simple grid pattern. When I connected it to my hose, I appreciated how quick and tool-free the setup was—just clip it on, and it was ready in under three minutes.
As I watched the water streams spring to life, I realized just how evenly it distributed water across my 4×8 raised bed. Unlike my old drip system that left dry patches, this surrounds each plant with 16 gentle streams.
It’s like giving every plant a little hug of water, right at soil level.
Using it daily, I noticed how little maintenance it required. The built-in mesh filter kept debris out, and brushing off the tubes was all I needed for upkeep.
Plus, knowing it’s UV-resistant and made to last through harsh weather gives me peace of mind. I’ve had my units since 2013, and they still work perfectly.
What I really love is how reliable it is—no leaks, no clogging, just consistent watering. It’s a game-changer for busy days or when I’m away.
It also saves me time because I no longer need to reposition hoses or worry about dry spots. Just hook up, set my timer, and forget about it.
If you’re tired of dealing with fragile drip lines or uneven watering, this system feels like a smart upgrade. It’s simple, effective, and designed by gardeners who understand the pain points.
Honestly, it’s made my garden healthier and my life easier.
Push-to-Connect Drip Irrigation Kit with Emitters and Tubing

- ✓ Easy push-to-connect fittings
- ✓ Leak-proof and durable
- ✓ Fully customizable setup
- ✕ Slightly higher cost
- ✕ Limited to compatible fittings
| Main Tubing Length | 50 feet of 1/2-inch diameter |
| Drip Emitters | 15 pcs vortex emitters and 15 pcs drip emitter streams included |
| Tubing Diameter | 1/4 inch for individual plant watering, 1/2 inch for main line |
| Connection Type | Push-to-connect fittings for quick, leak-proof assembly |
| Material Durability | High-quality, leak-proof fittings designed for season-long use |
| Expansion Compatibility | Compatible with additional fittings and tubing for system expansion |
Imagine you’re crouched over your flower bed, desperately trying to connect tiny barbed fittings with sweaty hands and aching fingers. That’s when the Spalolen Push-to-Connect Drip Irrigation Kit caught your eye, promising a quick setup with just a simple push.
You give it a try, and honestly, it’s a game-changer.
The moment you start pushing fittings into the tubing, you realize how effortless it is. No fiddling, no twisting, just push and lock.
It snaps in securely, and you can feel the quality—solid, leak-proof, and built to last. The 50-foot main line distributes water evenly across your entire garden, eliminating those dry patches you used to battle with traditional kits.
What’s even better is how flexible it is. You can easily add or move around the emitters, making your watering system adapt to your garden’s changing layout.
The included connectors and adapters make expansion a breeze, so you don’t have to worry about outgrowing your initial setup.
Using it, watering feels less like a chore and more like a simple task. Your plants get consistent moisture, and you spend less time adjusting and fixing leaks.
Plus, the all-in-one kit means you’re ready to go right out of the box—no extra trips to the store or complicated assembly required.
Overall, this system turns what used to be a hassle into a straightforward, reliable process. If you’re tired of leaks, uneven watering, or struggling with fittings, this kit could be exactly what your garden needs.
What Is the Best Irrigation System for Flower Beds?
A suitable irrigation system for flower beds delivers optimal water supply to promote plant health. Drip irrigation, soaker hoses, and sprinkler systems are common choices tailored to different garden needs.
According to the American Society of Agricultural and Biological Engineers, effective irrigation systems improve water efficiency and ensure plants receive adequate hydration. These systems can minimize water waste, contributing to sustainable gardening practices.
Irrigation systems vary in mechanics and efficiency. Drip irrigation targets plant roots directly, reducing evaporation and runoff. Soaker hoses allow slow seepage along the garden bed, while sprinkler systems distribute water over a wider area.
The Purdue University Extension describes drip irrigation as the most efficient method for water delivery, stating it applies water directly to the roots. This method is particularly beneficial in areas with limited water resources.
Factors affecting irrigation system efficiency include soil type, local climate, and plant water requirements. Sandy soils drain quickly, needing more frequent watering. In contrast, clay soils retain moisture, requiring less irrigation.
The U.S. Environmental Protection Agency reports that efficient irrigation can reduce water use by 30-50%. This efficiency is significant as urban areas face increasing water demand.
Poor irrigation practices can lead to waterlogging, affecting root health, or under-watering, which stresses plants. Consequently, choosing the right system is crucial for maintaining healthy flower beds.
To promote efficient irrigation, experts recommend using smart controllers that adjust watering based on weather conditions. Additionally, mulching reduces evaporation, enhancing water retention.
Strategies like zoning your garden and monitoring soil moisture can optimize irrigation. These practices ensure that flower beds thrive while conserving water resources.
How Does Drip Irrigation Enhance Flower Bed Health?
Drip irrigation enhances flower bed health by providing targeted water delivery to the plant roots. This method reduces water waste, as it delivers water directly to the soil around each plant. It minimizes evaporation loss since water seeps into the ground rather than flowing over the surface. Drip irrigation encourages deep root growth, which leads to stronger plants.
The system operates with a network of tubes and emitters. Emitters distribute a slow, steady stream of water, ensuring that plants receive consistent moisture. This consistent watering prevents stress during dry periods and promotes healthier blooms.
Additionally, drip irrigation reduces weed growth. By concentrating water on the flowers rather than the entire area, it limits moisture in unwanted locations where weeds may thrive. Finally, this irrigation method also reduces plant disease risks. Wet leaves create conditions for fungal infections, but drip irrigation keeps foliage dry. Overall, drip irrigation creates an optimal environment for vibrant and healthy flower beds.
What Are the Benefits of Using Spray Irrigation for Flower Beds?
Spray irrigation for flower beds offers several advantages, including improved water efficiency, reduced weed growth, and uniform water distribution.
- Improved Water Efficiency
- Reduced Weed Growth
- Uniform Water Distribution
- Flexibility in Coverage
- Less Soil Erosion
- Potential for Automation
- Disease Prevention
There are varying opinions on these benefits, particularly regarding potential drawbacks like initial costs, maintenance requirements, and specific flower bed needs.
-
Improved Water Efficiency:
Improved water efficiency in spray irrigation ensures that plants receive adequate moisture without excess runoff. Spray systems can deliver water directly to the plant roots. According to a 2019 report by the University of California, studies suggest that spray irrigation can reduce water use by up to 30% compared to traditional methods. This efficiency is critical in maintaining healthier flower beds while conserving water resources. -
Reduced Weed Growth:
Reduced weed growth occurs as spray irrigation minimizes water exposure to surrounding areas. By targeting the plants specifically, it discourages weed germination in dry soil. Research from North Carolina State University indicates that proper irrigation methods can decrease weed growth significantly. This benefit promotes healthier flower beds by allowing flowers to thrive without competition. -
Uniform Water Distribution:
Uniform water distribution achieved through spray irrigation ensures that all plants receive equal moisture amounts, which promotes consistent growth. Studies from the American Society of Agronomy show that systems designed for efficiency can offer up to 90% uniformity in water application. This uniformity helps prevent under or over-watering, leading to healthier flowers. -
Flexibility in Coverage:
Flexibility in coverage allows gardeners to adjust spray patterns or ranges to accommodate various flower bed shapes and sizes. This adaptability is essential for optimizing water use across different bed configurations. For example, portable spray heads can be repositioned, giving homeowners greater control over irrigation practices. -
Less Soil Erosion:
Less soil erosion occurs with spray irrigation since it reduces the volume of water applied at once. Gentle application prevents the disturbance of topsoil. The USDA Natural Resources Conservation Service reports that minimizing soil erosion is crucial for maintaining soil health, which in turn supports robust plant growth. -
Potential for Automation:
Potential for automation through technology integration makes spray irrigation a convenient option. Automated timers and sensors can ensure timely watering, freeing up time for gardeners. A study from the Irrigation Association shows that automation can lead to water savings of 25% or more while facilitating consistent watering schedules. -
Disease Prevention:
Disease prevention benefits arise as spray irrigation reduces excessive moisture on foliage compared to other methods. Wet leaves can promote fungal diseases. The University of Illinois Extension emphasizes that proper irrigation can significantly reduce the likelihood of common garden diseases. Keeping leaves dry contributes to overall plant health.
How Can You Set Up an Efficient Irrigation System for Your Flower Beds?
To set up an efficient irrigation system for your flower beds, consider using drip irrigation, scheduling watering times appropriately, and regularly maintaining the system.
Drip irrigation: This method delivers water directly to the roots of plants. It uses a network of pipes and emitters to minimize evaporation and runoff. A study by the University of Georgia (Smith, 2020) found that drip irrigation can reduce water usage by up to 50%. Benefits include:
– Water conservation: Drip irrigation ensures that water reaches plant roots directly, minimizing waste.
– Reduced weeds: This method decreases water delivery to unwanted plants, allowing for better growth of the flowers.
– Healthier plants: Consistent moisture levels help reduce plant stress and promote healthy growth.
Scheduling watering times: Timing when to water flowers is crucial for efficient irrigation. Watering in early mornings or late evenings minimizes evaporation. The USDA Natural Resources Conservation Service (Johnson, 2019) suggests that watering when temperatures are cooler can save up to 30% more water. Key points include:
– Avoid mid-day watering: High temperatures can lead to quicker evaporation, wasting water.
– Monitor soil moisture: Use a moisture meter to determine when to water. This prevents overwatering and underwatering.
Regularly maintaining the system: Keeping your irrigation system in good condition is essential for efficiency. Regular maintenance includes:
– Checking for leaks: Inspect pipes and connections for leaks to ensure optimal water delivery.
– Cleaning emitters: Debris can clog emitters, reducing water flow. Cleaning them regularly ensures consistent water distribution.
– Adjusting sprinkler heads or emitters: Ensure that the water is reaching all parts of the flower bed evenly to prevent dry spots.
By utilizing drip irrigation, appropriately timing your watering, and maintaining your system, you can create an efficient irrigation setup for your flower beds.
What Are the Key Steps to Install a Drip Irrigation System?
To install a drip irrigation system, follow these key steps: planning your layout, gathering materials, setting up the main line, installing emitters, connecting to a water source, and testing the system.
- Planning your layout
- Gathering materials
- Setting up the main line
- Installing emitters
- Connecting to a water source
- Testing the system
The next part will explain each of these steps in detail to ensure a successful installation.
-
Planning Your Layout:
Planning your layout involves determining the areas that will receive irrigation. You should draw a diagram that includes the garden or field size, plant types, and layout pattern. This step helps ensure that all areas get adequate water without overlap. Efficient planning can optimize water usage and increase crop yields. Studies show that poorly designed systems can waste up to 30% more water. -
Gathering Materials:
Gathering materials includes sourcing all necessary components for your system. Common materials required are mainline tubing, drip tubing, emitters (or drippers), connectors, stakes, and filters. You may choose between plastic or metal components based on durability and cost. Choosing high-quality and appropriate materials can extend the system’s lifespan and improve efficiency. -
Setting Up the Main Line:
Setting up the main line involves laying down the main tubing that connects to the water source. Ensure the tubing runs parallel to the planting rows for optimal coverage. Secure the main line using stakes to prevent movement. A proper installation helps minimize pressure losses and enhances water distribution. -
Installing Emitters:
Installing emitters involves placing the drip emitters along the tubing at the desired spacing for each plant. Emitters release water at a controlled rate, ensuring that plants receive the right amount of moisture. Precise emitter placement can influence plant health and growth rates. According to research from Texas A&M University, proper emitter installation can increase crop yield by as much as 25%. -
Connecting to a Water Source:
Connecting to a water source includes attaching the main line to a faucet or pump. You should ensure that the water supply has sufficient pressure for the system. Consider using a pressure regulator if the water pressure is too high, as excessive pressure can damage the system. Connection methods can vary based on your water source, so ensure compatibility. -
Testing the System:
Testing the system involves running the system to check for leaks, proper emitter function, and pressure levels. You should monitor the water distribution for even coverage across all plants. Adjustments can be made as needed to fix any issues. A comprehensive test can save time and resources in the long run, as it ensures the system operates efficiently before it is fully utilized.
What Best Practices Should You Follow for Spray Irrigation Setup?
The best practices for spray irrigation setup focus on efficient water application, system design, and maintenance.
- Assess Soil Type and Moisture Needs
- Choose Appropriate Spray Emitters
- Design Effective System Layout
- Install a Pressure Regulator
- Implement Timers and Controllers
- Adjust for Wind and Evaporation
- Regular Maintenance and Inspections
To understand these best practices more deeply, we can explore each component and its significance in spray irrigation.
-
Assess Soil Type and Moisture Needs: Assessing soil type and moisture needs is crucial for optimizing water delivery. Different soils absorb and retain water differently. For example, sandy soil drains quickly and requires more frequent irrigation, while clay soil retains moisture longer. Understanding these properties helps in determining watering schedules.
-
Choose Appropriate Spray Emitters: Selecting appropriate spray emitters is essential for efficient water distribution. Emitters vary in flow rate and coverage area. For instance, fixed spray heads work well for small, discrete areas. In contrast, rotating nozzles can cover larger areas more effectively. Choosing emitters suited for specific plant needs can improve water efficiency and plant health.
-
Design Effective System Layout: Designing an effective system layout involves planning the placement of spray heads to ensure even coverage. A triangular or rectangular configuration can provide uniform water distribution. Avoiding overlap can lead to under-watering or over-watering, which can damage plants.
-
Install a Pressure Regulator: Installing a pressure regulator is important for maintaining consistent water pressure across the irrigation system. High pressure can cause over-spray or mist, leading to water waste. A regulator ensures optimal pressure for the emitters, improving the system’s efficiency.
-
Implement Timers and Controllers: Implementing timers and controllers helps automate the irrigation process. Automated systems can be programmed based on local weather conditions, reducing water use. Studies show that using smart controllers can reduce water usage by up to 30% compared to manual watering.
-
Adjust for Wind and Evaporation: Adjusting for wind and evaporation is necessary to minimize water loss during irrigation. Wind can disrupt spray patterns and cause uneven distribution. Conducting irrigation during calm times of the day, such as early morning, can help maintain application efficiency and reduce evaporation.
-
Regular Maintenance and Inspections: Regular maintenance and inspections are vital for ensuring that the spray irrigation system remains effective. Checking for clogs, leaks, and worn-out components can prevent water wastage. Research indicates that maintaining an irrigation system can increase water use efficiency by ensuring all parts function properly.
By following these best practices, one can enhance the effectiveness and sustainability of spray irrigation systems.
What Are the Costs Associated with Irrigation Systems for Flower Beds?
The costs associated with irrigation systems for flower beds include initial setup costs, operational costs, maintenance costs, and potential changes in water bills.
- Initial Setup Costs
- Operational Costs
- Maintenance Costs
- Water Bill Changes
- Additional Equipment Costs
The above aspects of irrigation systems can vary significantly based on the type of system chosen, local water rates, and specific garden needs.
-
Initial Setup Costs: Initial setup costs involve the expenses related to purchasing and installing the irrigation system. This includes the cost of materials, such as pipes, hoses, sprinklers, or drip systems. According to a report by the Irrigation Association, the average cost for a basic drip irrigation system can range from $500 to $2,000, depending on the size and complexity of the setup. For example, installing a soaker hose system may be more economical, typically costing between $50 and $200 for small flower beds.
-
Operational Costs: Operational costs refer to the ongoing costs incurred during the use of the irrigation system, primarily the water required for irrigation. These costs can fluctuate based on local water rates and consumption levels. The Environmental Protection Agency (EPA) states that, on average, outdoor water usage accounts for about 30% of total household water use. Homeowners who implement smart irrigation practices can reduce these costs significantly, as they can conserve water and reduce expenses.
-
Maintenance Costs: Maintenance costs are the expenses related to ensuring the irrigation system continues to function effectively. This involves repairs, replacements, and seasonal adjustments. Regular checks are needed to clear blockages in drip lines and to ensure sprinklers are functioning properly. The University of California Cooperative Extension notes that homeowners may expect to spend 5-10% of their initial investment annually on maintenance.
-
Water Bill Changes: Water bill changes will occur if the irrigation system increases overall water consumption. Depending on the efficiency of the system, homeowners may see an increase or decrease in their water bills. The EPA suggests that efficient irrigation can reduce water bills by up to 50%. Homeowners must consider how much water their systems will require and whether those expenses will offset their garden’s benefits.
-
Additional Equipment Costs: Additional equipment costs can include timers, rain sensors, and filters, which improve overall efficiency. Timers help automate watering schedules, while rain sensors can prevent unnecessary watering during precipitation events. According to the Irrigation Association, using additional technology can lead to savings of 20-50% on water usage, which may justify the initial extra investment.
These cost factors can significantly influence the decision-making process when planning an irrigation system for flower beds.
How Much Should You Budget for a Drip Irrigation System?
To budget for a drip irrigation system, homeowners should estimate costs between $1,000 and $4,000 for installation. Factors affecting this range include the size of the area to be irrigated, the type of plants, and whether the installation is done professionally or as a DIY project.
For residential systems, the average cost for DIY installation is about $1 to $2 per square foot. For example, for a 1,000 square foot garden, a homeowner might spend between $1,000 and $2,000. Professional installation typically ranges from $2 to $4 per square foot, leading to possible expenses between $2,000 and $4,000 for the same area.
Material quality also influences costs. Standard systems that use PVC materials are more affordable but may not last as long as high-end systems that use durable components like polyethylene. A standard drip irrigation kit costs around $50 to $150, while advanced systems can exceed $300.
Maintenance costs should also be considered. Regular checks and repairs can amount to around $100 per year. Another factor to consider is water pressure; some systems require a pressure regulator, adding approximately $25 to $100 to the initial setup costs.
Lastly, local climate conditions and water availability may affect the need for a drip system. Regions with frequent rain might reduce the system’s necessity, whereas arid areas might require a more extensive investment.
In conclusion, budgeting for a drip irrigation system varies significantly based on size, installation type, materials, and maintenance needs. Homeowners should assess their specific requirements and local conditions to create a more tailored estimate.
What Is the Price Range for Spray Irrigation Systems?
The price range for spray irrigation systems varies based on several factors, including system size, components, and installation costs. Typically, these systems can cost between $1,500 and $3,500 for residential setups. Larger agricultural systems can range from $10,000 to $100,000.
The Irrigation Association provides definitions and standards related to irrigation systems, including spray irrigation’s classification as a system using pressurized water to deliver moisture to crops or landscapes through spray nozzles.
Spray irrigation systems consist of various components, including pipes, pumps, and sprinkler heads. System efficiency, water distribution uniformity, and specific crop requirements significantly affect overall costs and pricing strategies.
According to the USDA, the initial setup costs for spray irrigation systems can be influenced by geographical location, labor costs, and the local water source availability. Different regions may present unique pricing scenarios.
Several factors contribute to the price range, including the type of plants being irrigated, water pressure requirements, and the complexity of the system design. Additionally, ongoing maintenance and operational costs should also be considered.
Statistical data from Farm and Ranch Management publications indicate a potential 25% increase in demand for advanced irrigation systems over the next decade due to climate changes affecting water availability.
Inefficient irrigation practices can lead to water shortages, increased operational costs, and environmental degradation. Conversely, well-planned spray irrigation systems improve crop yields and reduce water waste.
Impacts can extend to health through improved food security, environmental benefits by conserving water, and economic growth driven by efficient agricultural practices.
Examples include increased vegetable production in arid regions through targeted irrigation, which can significantly enhance local diets and reduce food deserts.
To address irrigation issues, the USDA recommends adopting precision irrigation technologies and investing in ongoing education for best practices.
Strategies may include using soil moisture sensors, automated systems that adjust water delivery based on weather data, and implementing rainwater harvesting practices to enhance water sustainability.
What Maintenance Practices Are Essential for Flower Bed Irrigation Systems?
The essential maintenance practices for flower bed irrigation systems include routine inspection, cleaning, adjusting, and repairing components.
- Routine Inspection
- Cleaning Filters and Emitters
- Checking for Leaks
- Adjusting Water Pressure
- Testing Soils and Plants
- Seasonal Winterizing
- Scheduling Regular System Audits
Regular upkeep is crucial for ensuring the system operates efficiently. Each practice plays a vital role in maintaining the health of the irrigation system.
-
Routine Inspection:
Routine inspection involves regularly checking the irrigation system for any visible signs of damage or wear. This includes looking at pipes for leaks, inspecting emitters for blockages, and ensuring that the system operates efficiently. The Irrigation Association recommends performing these inspections at least once per month to maintain optimal performance. -
Cleaning Filters and Emitters:
Cleaning filters and emitters is vital for preventing clogs that can disrupt water flow. Filters accumulate debris over time, which can decrease water pressure. Emitters can also become blocked, leading to uneven watering. According to the University of Florida’s IFAS Extension, it is recommended to clean these components at the beginning and end of each growing season. -
Checking for Leaks:
Checking for leaks is an essential practice as it helps to conserve water and save on utility costs. Leaks can occur due to aging materials or inadvertent damage. The American Society of Irrigation Consultants suggests conducting a leak detection test every six months to spot issues promptly. -
Adjusting Water Pressure:
Adjusting water pressure ensures that the system delivers the appropriate amount of water to plants. High pressure can damage emitters, while low pressure can lead to inadequate watering. The University of California’s Cooperative Extension states that an optimal pressure range is typically between 20 to 30 psi (pounds per square inch) for most systems. -
Testing Soils and Plants:
Testing soils and plants involves assessing moisture levels and understanding the specific watering needs of the flower bed. Soil moisture sensors can provide real-time data on when to irrigate. A study published by the Soil Science Society of America reveals that proper soil testing can reduce water use by up to 30%. -
Seasonal Winterizing:
Seasonal winterizing is important in colder climates to prevent pipe damage from freezing temperatures. This process includes draining the system, insulating pipes, and removing any movable components. The National Gardening Association emphasizes that proper winterization can extend the life of the irrigation system significantly. -
Scheduling Regular System Audits:
Scheduling regular system audits is essential to assess the overall performance of the irrigation system. Audits can reveal inefficiencies, areas for improvement, and compliance with local water usage regulations. Research by the EPA indicates that regular audits can reduce water waste by 20% to 50% while maintaining plant health.
These maintenance practices are integral to ensuring the longevity and efficiency of irrigation systems used in flower beds.
How Often Should You Inspect and Maintain Your Drip Irrigation System?
You should inspect and maintain your drip irrigation system at least once a month. Monthly checks help identify issues early, such as clogs or leaks. During these inspections, examine the emitters, tubing, and filter for blockages. Clean any debris or build-up to ensure proper water flow. Additionally, conduct a thorough maintenance review at least twice a year. This review should include checking the entire system for wear and tear, replacing damaged parts, and ensuring the timer and pressure regulator function properly. Regular maintenance prevents more extensive and costly repairs, ensuring efficient water distribution to your flower beds. Always adjust your inspection frequency based on your system’s usage and environmental conditions.
What Routine Care Is Needed for Spraying Irrigation Systems?
The routine care needed for spraying irrigation systems includes regular maintenance and monitoring tasks to ensure optimal performance and longevity.
- Inspect and clean filters regularly
- Check and adjust spray patterns
- Monitor system pressure
- Repair or replace damaged components
- Schedule seasonal inspections
- Flush the system periodically
- Adjust scheduling based on weather conditions
Performing these tasks ensures efficiency and effectiveness in delivering water. Below is a more detailed explanation of each point.
-
Inspect and clean filters regularly: Inspecting and cleaning filters in spraying irrigation systems involves ensuring that the filters remain unobstructed and functional. Clogged filters can restrict water flow and lead to uneven distribution of water to plants. Regular cleaning can be done every few weeks or as needed, depending on debris in the water source.
-
Check and adjust spray patterns: Checking and adjusting spray patterns ensures that water reaches all desired areas without oversaturation or drought. This may involve replacing nozzles or altering their angles. Properly set spray patterns help prevent water wastage and promote healthy plant growth.
-
Monitor system pressure: Monitoring system pressure helps maintain consistent water delivery. Irregular pressure can indicate leaks or blockages. It’s advisable to use a pressure gauge at various points in the system. Adjustments may be needed to ensure optimal pressure settings as per manufacturer recommendations.
-
Repair or replace damaged components: Repairing or replacing damaged components, such as hoses, fittings, or nozzles, is essential for system integrity. Deteriorated parts can lead to leaks or mechanical failure. Regular inspections can help identify issues early, avoiding larger problems and expenses later.
-
Schedule seasonal inspections: Scheduling seasonal inspections aligns system care with changing weather patterns and plant needs. Maintenance before and after the growing season can enhance system efficiency. This may include reviewing system design and ensuring it meets any new water conservation standards.
-
Flush the system periodically: Flushing the system periodically removes sediment buildup and prevents clogging in the nozzles and lines. This process can be performed at a specific time, such as before the irrigation season begins. Flushing also reduces the risk of algae or bacteria growth within the water lines.
-
Adjust scheduling based on weather conditions: Adjusting watering schedules based on actual weather conditions helps maintain soil moisture levels. Automated timers can include weather sensors to modify irrigation times based on rainfall. This responsive approach prevents overwatering during wet conditions and ensures adequate watering during dry periods.